Creative & Calming Ideas with the Light Table
This post may contain affiliate links, including for the KiwiCo Light Table. If you choose to make a purchase through one of these links, I may earn a small commission at no extra cost to you.
When you walk into my counseling office—or my home—you might see something softly glowing in the background: a light table. At first, it may seem like just a fun visual toy. But over the past few years, it has become one of the most loved, versatile, and calming tools in both my work as a school counselor and in my parenting life.
Light tables are often thought of as classroom extras or preschool playroom staples, but when used with intention, they become so much more. I use them for emotional regulation, sensory exploration, quiet play, and even social-emotional learning prompts.
One of my favorite finds is the KiwiCo Light Table. It’s compact enough to fit in a small office or bedroom, yet sturdy and bright enough to anchor meaningful activities. It’s durable, beautifully made, and kid-friendly in every way. Whether I’m running a small group activity or giving my kids some quiet time before bed, it brings focus and calm to our day.
In this article, I’ll share how I use this light table in both settings—with practical ideas that other school counselors, therapists, and parents can try too.
Light Table Counseling Activities That Support Emotional Regulation
As a school counselor, I’m always on the lookout for tools that engage students without overstimulating them. The light table offers a gentle, almost magical visual pull that helps kids shift into a calmer, more regulated space—perfect for when they come in dysregulated or overstimulated from the classroom.
Here’s how I use it:
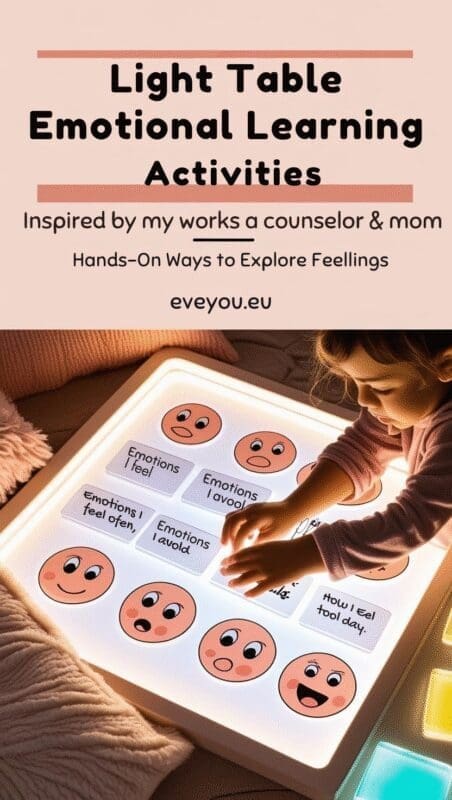
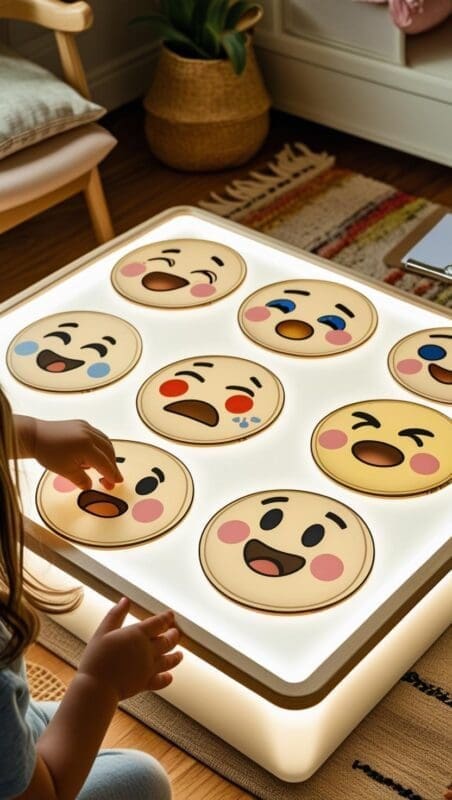
1. Emotion Sorting with Transparent Discs
I print small emoji faces or emotional expressions on transparent film and let students sort them into categories on the light table: “emotions I feel often,” “emotions I avoid,” or “how I feel today.” The gentle glow helps them focus, and the visual sorting gives me rich insights into their inner world.
🎨 How to Make Transparent Emoji Emotion Cards for Your Light Table
This is one of my favorite low-prep but high-impact activities in both my counseling office and at home. These transparent emoji cards invite children to engage with their feelings in a visual and hands-on way. Here’s exactly how I make and use them:
✅ Materials You’ll Need:
- Printable transparent film (for inkjet or laser printers—check compatibility with your printer type)
→ Tip: Look for “clear printable film” or “overhead projector sheets” - Emoji face images
→ You can use licensed-free emojis, create your own in Canva, or find cartoon emotion faces online that include a variety like happy, sad, angry, anxious, calm, etc. - Printer
- Scissors or circle cutter
- Optional: Laminator and clear laminating sheets (for extra durability)
- Sticky notes or small clear labels for sorting categories (e.g., “I feel this often,” “I avoid this,” “I feel this today”)
- Zipper pouch or photo box to store the discs
🖨 Step-by-Step Instructions:
1. Choose or Create Emotion Faces
Select 10–15 emotion icons representing a wide range of feelings. Include both basic and complex emotions (e.g., happy, sad, angry, confused, embarrassed, proud, shy, tired, excited, overwhelmed).
Tip: For young children, stick to expressive cartoon faces with big, clear features. For older students, you can include subtle emotions like “guilty” or “hopeful.”
2. Format & Print
Use a program like Canva, PowerPoint, or Google Slides to place each emoji in a circle shape (around 2–3 inches wide is ideal). Print them onto transparent film using your printer’s best quality setting.
Tip: Test print one page before printing in bulk, as transparency sheets can smudge if not printed properly.
3. Cut into Circles or Squares
Cut out each emotion using scissors or a craft circle cutter for a smooth, consistent look. If you laminated your film, trim carefully along the edges.
4. Sort & Use on the Light Table
Set out 3 sorting areas directly on the light table with clear labels:
- Emotions I Feel Often
- Emotions I Avoid
- How I Feel Today
Invite students to place the emoji faces in the categories based on how they relate in the moment.
💡 Counselor Tips for Use:
- Use this activity at the start of individual or small group sessions as a nonverbal emotional check-in.
- Encourage discussion only after students have placed the cards—it gives them time to reflect first.
- Rotate or add new emotions every few weeks to support emotional vocabulary expansion.
- For non-readers, use color-coded dots or symbols instead of written category labels.
2. Mindfulness & Breathing Prompts
I guide students to trace gentle shapes or mandalas on tracing paper over the light table. Sometimes we breathe slowly while tracing, using finger labyrinths or spiral patterns. It’s a peaceful way to introduce mindfulness, especially for kids who are not ready to sit still for meditation.
✨ How to Create Finger Tracing Shapes for Light Table Mindfulness
Finger tracing is a beautiful way to introduce mindfulness to kids who struggle with sitting still. By combining slow movement with visual focus and breathing cues, the light table becomes a calming, self-regulation tool that invites quiet engagement without pressure.
✅ Materials You’ll Need:
- Tracing paper or vellum sheets (semi-transparent and ideal for light table use)
- Printed templates of simple shapes (see below for ideas)
- Printer or pen for hand-drawing designs
- Clipboards or washi tape (to secure tracing paper to the table, optional)
- Laminator (optional) for reusable versions
🌀 Step-by-Step Instructions:
1. Choose Calming Shapes to Trace
Start with shapes that are:
- Simple and rhythmic (great for breathing regulation)
- Smooth and repetitive (ideal for finger movement)
- Meaningful or symbolic (like growth spirals or “mountain” breathing visuals)
Ideas for beginner-friendly tracing patterns:
- Circles (breathing in as you trace half, out as you complete)
- Spirals (slow, inward or outward motion)
- Infinity loops (figure-eight shapes)
- Wavy mountain or ocean wave lines (perfect for “breathe in, breathe out”)
- Basic labyrinths (finger paths for quiet focus)
Tip: Canva, Teachers Pay Teachers, or mindful drawing books often have free or low-cost templates.
2. Print or Draw on Tracing Paper
Place each shape design on a sheet of tracing paper. You can:
- Print directly onto tracing paper (if your printer supports it)
- Hand trace the design onto tracing paper using a black marker
Tip: Use bold black lines—fine lines are hard to see when lit from beneath.
3. Laminate for Reuse (Optional)
If you want to use them repeatedly, laminate the tracing sheet or place them in clear sheet protectors. You can also have students trace with dry-erase markers (and then wipe clean).
4. Set Up on the Light Table
Lay the sheet flat on the light table. Secure the corners with washi tape or clips if needed. Show students how to:
- Slowly trace the pattern with their finger
- Inhale during one part of the shape, exhale during another (e.g., breathe in up the “mountain,” breathe out down the other side)
💡 Counselor Tips for Use:
- Use these shapes as a transitional tool when students enter your office dysregulated or anxious.
- For younger children, pair the tracing with storytelling (“You’re climbing a mountain slowly… now you’re sliding down”).
- Invite students to create their own shapes or feelings-based patterns over time.
- Play soft instrumental music in the background to enhance the calming effect.
3. Therapy Storytelling with Shadows
I use translucent toys or cut-outs to act out stories or scenarios. The light makes the pieces feel alive, and this helps students externalize problems or imagine alternative endings. It’s an amazing tool for narrative therapy or SEL story work.
4. Group Regulation Activities
In small groups, students take turns adding colored tiles or gel shapes to the table as they name a coping skill or strength they’ve used. The growing design becomes a collaborative “calm map,” and the shared experience builds trust and connection.
5. Sensory Breaks Between Sessions
Sometimes, I don’t plan anything at all. Just turning on the light table and offering translucent sensory items (gel beads, nature leaves, calm jars) gives students the visual break they need to reset between classes.
Light Table Activities for Calm and Connection at Home
At home, my kids see the light table as something special—it signals calm, cozy, and creative time. Here are a few of our favorite family uses:
1. Calm-Down Time After School
Before jumping into homework or evening routines, I’ll often dim the lights and invite my kids to spend 10–15 minutes at the light table. They play with transparent blocks, shapes, or colored cups—nothing structured, just free, mindful play.
2. Emotion Exploration Through Art
Sometimes we draw “feelings creatures” on tracing paper, then layer them on the light table to see how feelings blend, overlap, or hide. This opens up beautiful conversations about mixed emotions in a way that feels safe and playful.
3. Shadow Puppet Bedtime Stories
Using simple shadow puppets and a darkened room, we tell bedtime stories with light table backlighting. It’s a calming, screen-free ritual that ends our day with connection and wonder.
4. STEM + Emotions Experiments
One night we experimented with transparent cups of water, food coloring, and pipettes—watching how colors mixed under the light. I turned it into an impromptu SEL moment: “What happens when we mix mad and happy?” My child said, “We get loud!” I’ll take that as insight.
5. Quiet Morning Play (Mom’s Coffee Time)
On weekend mornings, I often set up a simple invitation to play—like colorful leaves, sea glass, or transparent magnetic tiles. It keeps my kids engaged and calm while I sip coffee and wake up slowly.
Why the KiwiCo Light Table Is My Top Pick
I’ve tried a few light tables, and this one from KiwiCo stands out. It’s:
- ✨ Bright but gentle – Not harsh on sensitive eyes
- 🧰 Durable and kid-safe – No loose or breakable parts
- 💡 Perfect size – Fits in therapy rooms, living rooms, or homeschool spaces
- 🔌 Versatile – Works for therapy, play, and family time
Whether you’re a therapist, a parent, or both (like me), it’s a tool you’ll actually use—and love.
A Light Table Tool That Supports Kids’ Emotional Growth
Using a light table has become a beautiful part of both my professional work and family life. It slows things down. It invites reflection and conversation without pressure. And it creates an atmosphere of warmth and wonder in a world that often moves too fast.
If you’ve been searching for a tool that blends sensory regulation, creativity, and connection—whether in your counseling office or at your kitchen table—I highly recommend trying the KiwiCo Light Table.
Related Articles You Might Love:
- How to Create Calm Back-to-School Routines: A Mom & Counselor’s Guide
- Cute Gifts for School Counselors

About the Author
Hi, I’m Eve, a former school counselor with a master’s degree in School Psychology and a passionate advocate for children and families navigating sensory challenges. As a mom of children with sensory sensitivities, I deeply understand the journey special-needs parents face, and I dedicate myself to researching and sharing practical solutions to help children thrive and feel comfortable in their bodies. My goal is also to empower counselors, therapists, and psychologists with creative strategies and supportive resources to enrich their everyday practice. When I’m not writing or exploring new therapeutic approaches, you’ll find me spending quality time with my family and continually seeking inspiration from everyday moments.