
I love story stones.
They are one of my favorite tools for helping children build creativity, practice storytelling, explore emotions, and engage in social-emotional learning through play.
But if I’m being honest, there is one part I don’t always love:
Painting them.
Painting a few stones can be relaxing. Painting 30, 40, or 50 stones for a classroom, counseling office, or homeschool activity is a completely different experience.
It takes time.
It requires artistic skills that not everyone has.
And sometimes I simply need a set of story stones ready today—not next week.
That’s when I started experimenting with a different approach.
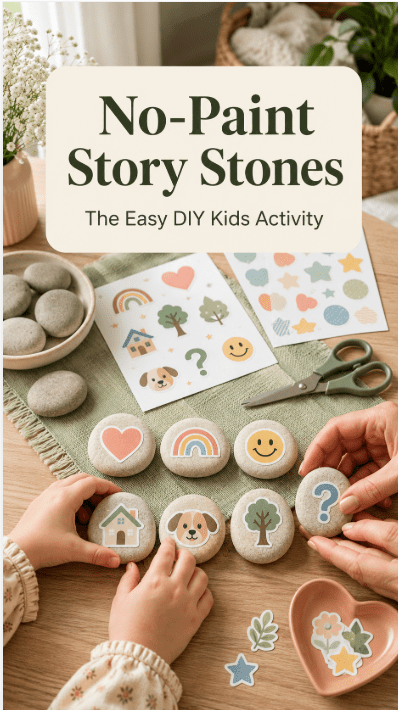
Instead of painting every image by hand, I began creating story stone designs in Canva, printing them onto sticker paper, and applying them directly to smooth stones.
The result surprised me.
The stones looked clean, consistent, professional, and took a fraction of the time to create.
In this article, I’ll show you exactly how I make story stones without painting them and why this method has become one of my favorite ways to create social-emotional learning tools.
Why I Stopped Painting Every Story Stone
I still enjoy painted story stones for certain projects.
But when creating larger sets, I kept running into the same problems.
Some stones looked great.
Others looked… less great.
Images varied in size.
Characters looked different from one another.
And creating themed sets often took hours.
For example, if I wanted:
- feelings story stones
- friendship story stones
- back-to-school story stones
- coping skills story stones
I could easily spend an entire weekend painting.
The Canva method solved many of those challenges.
It allowed me to:
- create matching designs
- make larger sets quickly
- use professional-looking graphics
- reuse designs for future projects
Most importantly, it made story stones accessible for people who don’t consider themselves artistic.
Why Story Stones Are Such Powerful SEL Tools
Story stones may look simple, but they support a surprising number of social-emotional skills.
When children create stories, they practice understanding emotions, solving problems, taking different perspectives, and organizing their thoughts.
Unlike direct questions, stories often feel safe.
A child might not want to say:
“I feel nervous about school.”
But they may happily tell a story about a worried rabbit starting first grade.
That emotional distance allows children to explore feelings without feeling pressured.
Story stones can support:
- emotional awareness
- empathy
- communication skills
- creative thinking
- problem solving
- emotional regulation
This is why I use them so often in SEL activities and school counseling.
Supplies You’ll Need
One reason I love this method is that it requires very few supplies.
You’ll need:
- smooth stones
- Canva (free or Pro)
- sticker paper
- color printer
- scissors
- Mod Podge or clear sealant (optional)
That’s it.
No painting skills required.
Step 1: Create Your Images in Canva
This is where the process becomes fun.
I start by creating simple images related to the theme I want.
For example:
Feelings Story Stones
- happy
- sad
- worried
- angry
- proud
- excited
Back-to-School Story Stones
- backpack
- teacher
- classroom
- playground
- friend
- school bus
Friendship Story Stones
- helping hand
- heart
- apology
- teamwork
- sharing
Canva has thousands of simple graphics that work beautifully for this purpose.
Keep the designs:
- simple
- bold
- easy to recognize
Story stones work best when children can immediately identify the image.
Step 2: Print on Sticker Paper
Once the designs are ready, print them onto sticker paper.
I recommend:
- matte sticker paper
- printable vinyl sticker paper
- waterproof sticker paper if available
Waterproof options tend to last longer, especially when used frequently by children.
Step 3: Cut Out the Images
Cut around each image.
Perfection isn’t necessary.
Children rarely notice tiny imperfections.
The goal is simply to create clear visual prompts.
This step usually takes far less time than painting dozens of stones by hand.
Step 4: Apply the Stickers to the Stones
Carefully place each sticker onto a smooth stone.
Press firmly to remove any air bubbles.
At this stage, the story stones are already usable.
But if you want them to last longer, there’s one more step.
Step 5: Seal the Story Stones
I like to add a protective layer.
This helps prevent:
- peeling
- scratches
- moisture damage
You can use:
- Mod Podge
- clear acrylic spray
- craft sealants
The result looks surprisingly polished and professional.
My Favorite Story Stone Sets to Make
One of the biggest advantages of the Canva method is how easy it is to create themed sets.
Feelings Story Stones
Perfect for:
- emotional regulation activities
- counseling sessions
- SEL lessons
Ideas:
- calm
- worried
- frustrated
- excited
- proud
Back-to-School Story Stones
Great for helping children process:
- school anxiety
- friendship worries
- classroom transitions
Ideas:
- backpack
- classroom
- teacher
- nervous face
- friend
New Baby Story Stones
Helpful for children adjusting to family changes.
Ideas:
- baby
- parent
- sibling
- helping hand
- heart
Friendship Story Stones
Perfect for school counseling groups.
Ideas:
- sharing
- teamwork
- kindness
- helping
- apology
Coping Skills Story Stones
One of my favorite sets.
Ideas:
- deep breathing
- drinking water
- asking for help
- movement break
- calm corner
These can be used during emotional regulation activities and counseling sessions.
Why This Method Works So Well for Teachers and School Counselors
One thing I hear repeatedly from educators is:
“I love the idea, but I don’t have time.”
That’s exactly why I started using this approach.
A Canva-based set can often be created in a fraction of the time required for painting.
It also allows you to:
- create duplicates easily
- replace damaged stones
- make seasonal sets quickly
- create matching classroom resources
For busy educators, that flexibility is incredibly valuable.
Looking Ahead: Cricut and Print-Then-Cut Story Stones
If you already own a Cricut machine—or are considering one—you can make this process even faster.
Using Canva together with Cricut’s Print Then Cut feature allows you to create highly consistent story stone sets with minimal cutting by hand.
This is something I’m currently exploring for larger classroom and counseling resources, and I’ll share more ideas in future posts.
Final Thoughts
Story stones don’t need to be complicated to be effective.
In fact, sometimes the simplest solutions are the most practical.
Creating story stones with Canva and sticker paper allows you to focus less on painting and more on what really matters: helping children tell stories, express emotions, and build important social-emotional skills through play.
And if you’re anything like me, having a complete set finished in one afternoon instead of one weekend is a pretty wonderful bonus.

About the Author
Hi, I’m Eve, a former school counselor with a master’s degree in School Psychology and a passionate advocate for children and families navigating sensory challenges. As a mom of children with sensory sensitivities, I deeply understand the journey special-needs parents face, and I dedicate myself to researching and sharing practical solutions to help children thrive and feel comfortable in their bodies. My goal is also to empower counselors, therapists, and psychologists with creative strategies and supportive resources to enrich their everyday practice. When I’m not writing or exploring new therapeutic approaches, you’ll find me spending quality time with my family and continually seeking inspiration from everyday moments.