
A summer walk can become a craft activity with only a basket, a few fallen petals, and a little time to notice what is growing. Flower mandalas and flower frames invite children to sort colors, compare shapes, build patterns, and make temporary art from natural materials.
These projects can be as simple or detailed as the child wants. A preschooler might press bright petals onto contact paper, while an older child may spend time building a symmetrical mandala or labeling a pressed-flower design. The goal is not a perfect result. It is to make something creative with materials that are available and safe to use.
This guide includes two complete projects, 13 variations, age adaptations, responsible collecting tips, and practical ways to preserve or photograph the finished work.
Affiliate disclosure: This post contains affiliate links. If you purchase through them, I may earn a small commission at no extra cost to you. As an Amazon Associate, Eveyou earns from qualifying purchases.
Start With Safe and Responsible Flower Collecting

Before children begin gathering materials, set a few clear boundaries. Use flowers and leaves from your own unsprayed garden, materials supplied by a trusted adult, or fallen pieces collected where local rules allow it. Do not pick plants from protected land, private property, public displays, or unfamiliar locations without permission.
An adult should identify every plant before children touch it. Avoid unknown berries, mushrooms, sap, thorns, irritating leaves, and any plant treated with pesticides or lawn chemicals. Some common garden plants can irritate skin or be unsafe if eaten. Teach children that craft materials stay out of mouths, and wash hands when the activity is finished.
Consider pollen allergies, asthma, sensitive skin, and insects. Shake materials gently outdoors, check for bees and small bugs, and offer gloves or tongs if touching plants is uncomfortable. For toddlers and children who mouth objects, use large paper flowers, pre-cut leaves, or adult-prepared pressed materials instead of loose petals and small seeds.
Responsible collecting can be part of the activity. Invite children to take only a few pieces from abundant plants, choose fallen petals first, and leave enough flowers for pollinators and other visitors.
Supplies for Flower Mandalas and Flower Frames
You do not need a large craft collection. Gather only the materials required for the version you plan to make.
For flower mandalas
- Fresh or pressed flowers and leaves that an adult has identified
- White cardstock circles, paper plates, or recycled cardboard
- Small sorting bowls or a muffin tin
- Washable child-safe glue
- Child-safe scissors for children who can use them appropriately
- Pencil, marker, or date stamp for optional labels
For transparent flower frames
- A cardboard frame, craft-stick frame, or an adult-prepared twig frame
- Clear self-adhesive contact paper or self-sealing laminating sheets
- Safe flowers, petals, grasses, and leaves
- Child-safe scissors
- Removable tape for displaying the finished frame
Cardboard is the easiest frame material for preschoolers. Twigs look natural, but an adult should check for splinters and secure the corners. Long string and hot glue should remain adult tools and be stored out of reach when not in use.
Shopping note: When choosing contact paper, check the roll dimensions and whether it is transparent rather than frosted. For scissors, follow the manufacturer’s age guidance and supervise their use.


How to Make a Simple Flower Mandala

A mandala is a circular design built around a center point. Children do not need to know any formal rules to explore radial patterns.
- Prepare a base. Cut a circle from cardstock or cardboard. A six- to eight-inch circle provides enough room without requiring a huge amount of plant material.
- Sort the materials. Group petals, leaves, and flowers by color, size, shape, or texture. This makes the choices easier to see.
- Choose a center. Place one flower head, leaf, pebble, or paper circle in the middle.
- Build outward. Add a ring of repeated petals or leaves. Continue with another color or shape.
- Adjust before gluing. Rotate the base and view the design from different sides. The pattern can be symmetrical, loose, or somewhere in between.
- Preserve or release it. Glue the materials to paper, photograph a temporary design, or return suitable loose materials to a compost container.
For a low-pressure version, skip the glue. Children can rebuild the same collection several times and notice how the result changes.
7 Flower Mandala Ideas for Kids
1. Sunshine Petal Mandala
Use yellow, orange, and cream petals around a round center. Dandelion petals, calendula, or paper petals can create a bright sunburst, but use only plants an adult has identified as safe to handle.
This is an easy first mandala because the color plan is simple. Preschoolers can place petals freely, while older children can alternate short and long shapes.
2. Green Leaf Mandala
Create the design entirely from leaves, herbs, and grasses. Compare rounded, pointed, smooth, and textured shapes. A leaf mandala is useful when flowers are scarce or when you want children to look beyond the brightest materials.
Avoid encouraging children to smell or taste unidentified herbs. If you use culinary herbs, keep them separate from plants collected only for crafting.
3. Rainbow Flower Mandala

Sort safe petals by color, then arrange them in rainbow order. If a color is missing, use colored paper, a small pebble, or leave an intentional gap. The activity does not need a complete set of natural colors to work.
Younger children can make colored sections. Older children may prefer narrow rings or repeating color sequences.
4. Tiny Blossom Mini Mandalas
Cut several small cardstock circles and make a different pattern on each one. Mini mandalas require fewer flowers and fit well at a classroom, camp, or party craft table.
Display the finished circles together as a temporary gallery. Write the child’s name on the back rather than across the design.
5. Color-of-the-Day Mandala
Invite the child to choose a color that appeals to them today, then build the mandala around it. The color does not need to represent a specific emotion, and adults do not need to interpret the choice.
If the child wants to talk about the design, follow their lead with open questions such as, “What did you notice while you were making it?” Silence is also a valid way to participate.
6. Gratitude Garden Mandala
As each ring is added, family or group members can name something they appreciate. Keep participation optional and accept small, everyday answers such as a favorite snack, a friend, or time outside.
Children who prefer not to speak can choose one petal for each private thought. This keeps the craft welcoming rather than turning it into a performance.
7. Collaborative Friendship Mandala

Place one large cardboard circle in the center of a table. Each child adds a ring, color section, or small repeating pattern. Agree before starting whether people may move one another’s pieces.
For larger groups, assign each child a wedge-shaped section. This reduces waiting and makes the boundaries clearer. A collaborative mandala can practice sharing materials and making a group decision, but adults should help without expecting perfect cooperation.
For more cooperative summer ideas, explore these summer camp activities for kids.
How to Make a Transparent Flower Frame

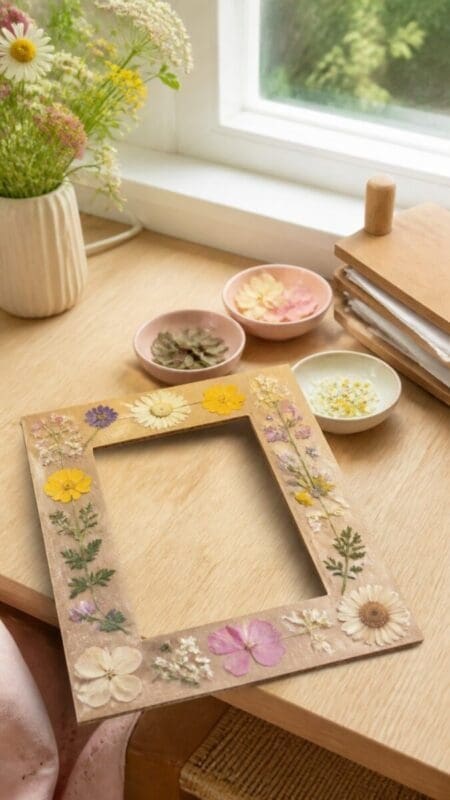
The simplest flower frame is made from cardboard and clear contact paper. It creates a translucent panel that can be held near a bright window or displayed against a light-colored wall.
- Cut the frame. An adult cuts a large opening from the center of sturdy cardboard, leaving a border about one to two inches wide.
- Add the sticky surface. Cut contact paper slightly larger than the opening. Attach it to the back of the frame with the sticky side facing forward.
- Arrange the flowers. Children press petals, leaves, and thin grasses onto the sticky area. Leave a little open space so light can pass through.
- Seal the design. Add a second sheet of contact paper over the front, sticky side down. Press outward to reduce air pockets.
- Trim and display. An adult trims the edges. Use removable tape suitable for the surface, or place the frame on a tabletop easel.
Do not ask children to stare directly at the sun through a frame. Display fresh-flower frames away from intense heat and expect the colors to fade or change as the materials dry.
Shopping note: A flower press can help flatten materials before they go into a frame. Choose a child-oriented kit with clear instructions, and check for small hardware or parts that require adult supervision.


6 Flower Frame Activity Ideas
1. Sky-Window Flower Frame
Use widely spaced petals and leaves so plenty of clear contact paper remains visible. Children can hold the frame against a blue-sky background for a photograph, while keeping their eyes away from direct sunlight.
The frame also looks effective against a plain wall if outdoor light is too bright.
2. Initial or Name Frame
Arrange petals in the shape of the child’s first initial. An adult can lightly draw the letter on the protective backing before it is removed, giving younger children a guide.
For a full name, use a wide rectangular frame and small pressed petals. Children who do not want their name displayed can create a favorite shape instead.
3. One-Color Flower Frame
Choose one color family and look for differences within it: pale pink, deep pink, pink-veined leaves, or matching paper pieces. This makes a visually cohesive frame even when the materials are mixed.
If natural materials in the chosen color are unavailable, combine a few real petals with tissue-paper shapes.
4. Feelings-and-Colors Frame
Children may choose colors or textures they connect with a feeling word such as energetic, peaceful, brave, or curious. Make it clear that colors do not have fixed emotional meanings and that the child decides what their choices represent.
They can add a word on the cardboard border or leave the design unlabeled. This is a creative prompt, not an assessment or treatment activity.
5. Botanical Story Frame
Use leaves and petals to build a tiny scene: grass along the bottom, a flower sun, a path of seeds, or a leaf butterfly. The transparent background makes the story appear to float.
Offer a small tray of materials rather than a large pile. Too many choices can make it harder for some children to begin.
6. Partner Flower Frame
Two children can divide the frame down the middle or alternate turns adding pieces. Decide whether the final design should connect across both sections or show two separate styles.
If sharing one small frame creates conflict, give each child an individual panel and join the finished pieces with removable tape for display.
Age and Setting Adaptations
Toddlers and young preschoolers
Use large adult-prepared petals or paper flowers and a cardboard frame with contact paper already attached. Avoid tiny seeds, berries, loose string, sharp twigs, and any material the child may put in their mouth. Keep the activity short and supervise closely.
Elementary-age children
Let children sort materials, test patterns, and use age-appropriate scissors. They may enjoy making labels, measuring repeated rings, or photographing temporary designs.
Older children and mixed-age groups
Offer more control over composition, preservation, and display. Older children can press flowers in advance, sketch a pattern, or help prepare safe paper bases while an adult handles cutting tools and hot glue.
Classrooms, camps, and counseling-inspired spaces
Set up one collection tray per table, a finished-materials area, and a compost or cleanup container. Check allergies and program rules in advance. In counseling or school settings, present the project as an optional creative activity rather than promising that it will calm or regulate every child.
For a related group activity, see these empathy activities for kids. If you are preparing a child-focused professional space for the season, these summer child therapy office ideas offer a separate room-design guide.

How to Preserve and Display the Finished Crafts
Fresh flowers contain moisture, so sealed projects may discolor or develop condensation. For a longer-lasting result, press the flowers until they are fully dry before gluing or sealing them.
- Photograph temporary mandalas from directly above in even shade.
- Date the back of paper projects so children can compare seasonal finds.
- Keep dried botanical art away from damp areas and intense direct sun.
- Display contact-paper frames temporarily and inspect them before long-term storage.
- Place unglued plant scraps in compost only if they are suitable for your composting system.
- Store reusable bowls, cardboard templates, and scissors together for the next nature craft.
Digital photographs are often the easiest keepsake. They preserve the colors without requiring every delicate project to remain intact.
Common Problems and Easy Fixes
The petals will not stick. Pat damp materials dry and use thinner petals. Thick flower heads are better for temporary mandalas than contact-paper frames.
The child is worried about symmetry. Suggest building one small ring at a time, or create an intentionally uneven “wild garden” design.
There are not enough flowers. Use leaves, grasses, paper shapes, or a smaller base. The activity should not require stripping a garden.
The frame looks crowded. Remove a few pieces and leave clear areas between clusters. Open space helps the shapes remain visible.
The group is waiting too long. Prepare bases and frames before the session, then divide materials among several trays.
A child does not want to touch the plants. Offer tongs, gloves, paper flowers, or the role of photographer. Participation does not need to involve direct sensory contact.
A Simple Summer Nature Craft to Try First
If this is your first flower craft, begin with a temporary mandala on a paper plate. It requires no special frame, allows children to rearrange their work, and can be photographed before cleanup.
When the group is ready for a project to display, try the cardboard contact-paper frame with fully identified, thin materials. Keep the collecting modest, the instructions flexible, and the safety boundaries clear. The result may be symmetrical, colorful, sparse, or wonderfully unexpected—and all of those outcomes can be part of a successful summer afternoon.

About the Author
Hi, I’m Eve, a former school counselor with a master’s degree in School Psychology and a passionate advocate for children and families navigating sensory challenges. As a mom of children with sensory sensitivities, I deeply understand the journey special-needs parents face, and I dedicate myself to researching and sharing practical solutions to help children thrive and feel comfortable in their bodies. My goal is also to empower counselors, therapists, and psychologists with creative strategies and supportive resources to enrich their everyday practice. When I’m not writing or exploring new therapeutic approaches, you’ll find me spending quality time with my family and continually seeking inspiration from everyday moments.

